

2024 is the revolution for IOT (Internet of things). The market is getting spread to explore IOT technology for their respective businesses. Every business is looking for the opportunity to implement IOT technology and some are already leading the market. As the market is already leading this technology and some are exploring to make it better to excellence, the semiconductor companies are coming up with multiple ICs and the development boards. In this NodeMCU is one of best IOT development board to explore IOT solutions. NodeMCU is a board name or a variant with ESP8266 Wi-Fi microcontroller. Something is going on your mind now, right? Yes, ESP8266 is also a microcontroller. This electronic component ESP8266 is a microcontroller solution which has at least minimum jobs like GPIO, ADC,serial communication, flash memory, RAM as per other microcontrollers.
Overview
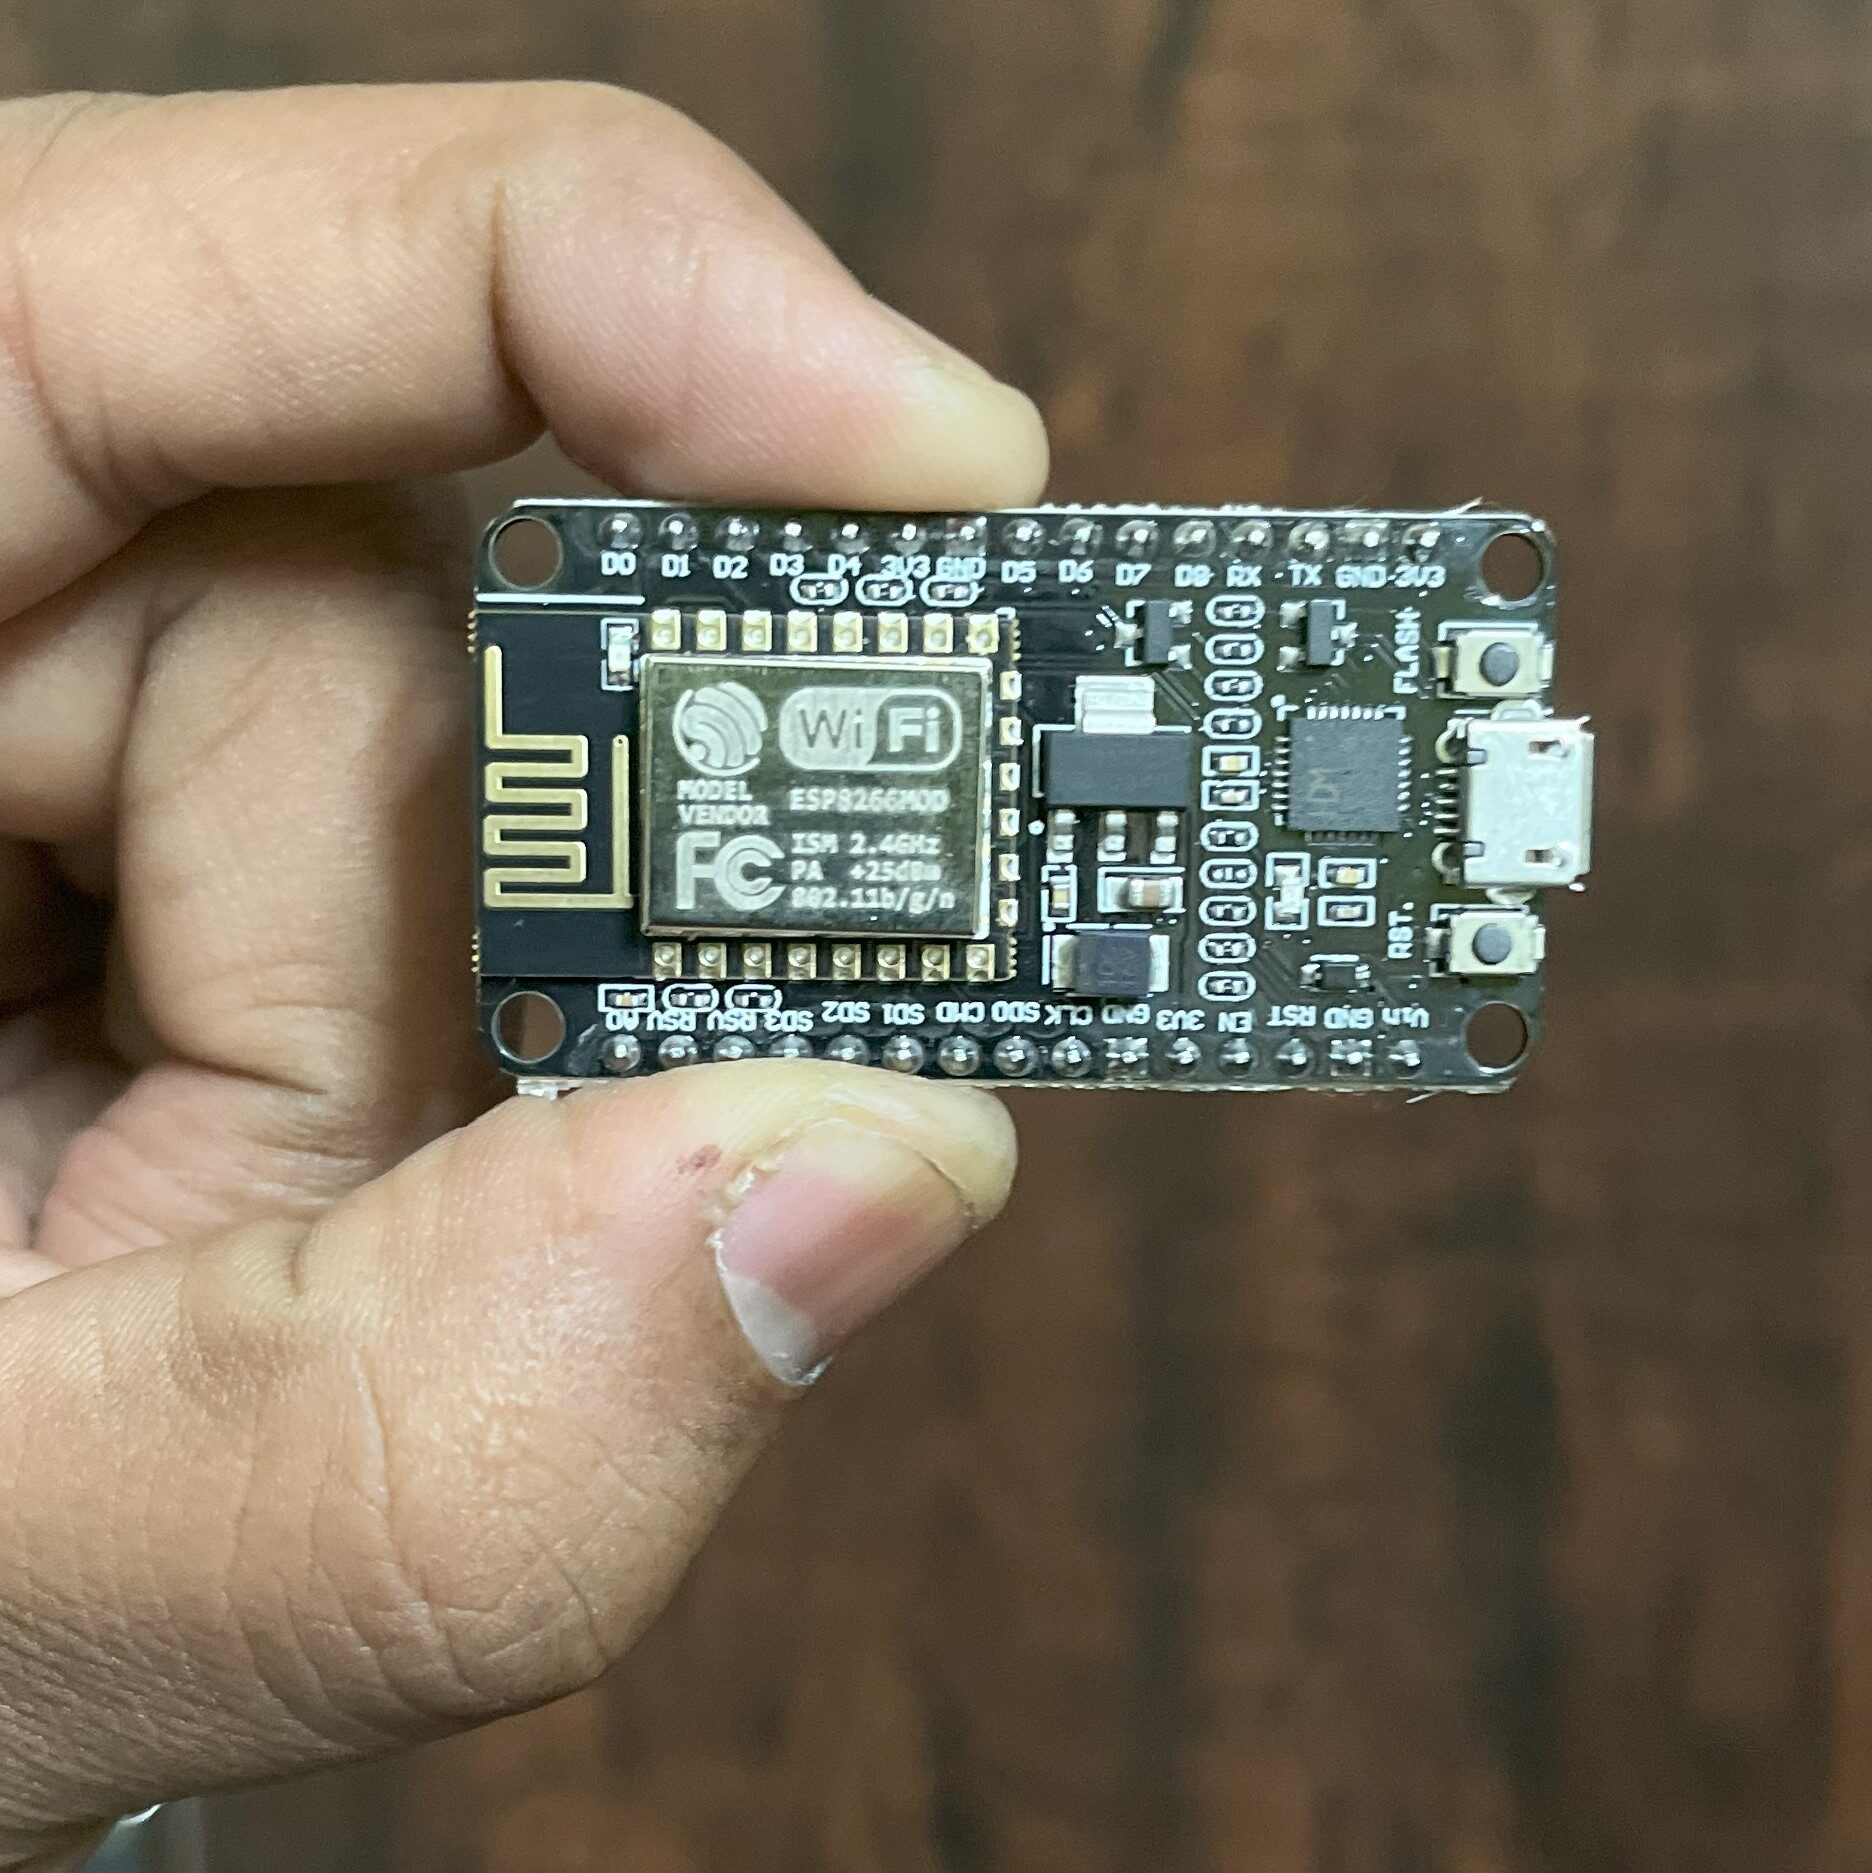
NodeMCU is an open source IOT platform based on Espressif ESP8266 SoC system. It is also an open-source firmware to design different IOT based prototypes or the solutions. This standalone device can be also used as Wi-Fi router to create a wireless network. Other devices or microcontrollers are connected as client to NodeMCU (SSID, Password).
There are two available versions of NodeMCU as version 0.9 & 1.0 where the version 0.9 contains ESP-12 and version 1.0 contains ESP-12E where E stands for “Enhanced”. Espressif also has ESP8266 SoC based another device called ESP32.
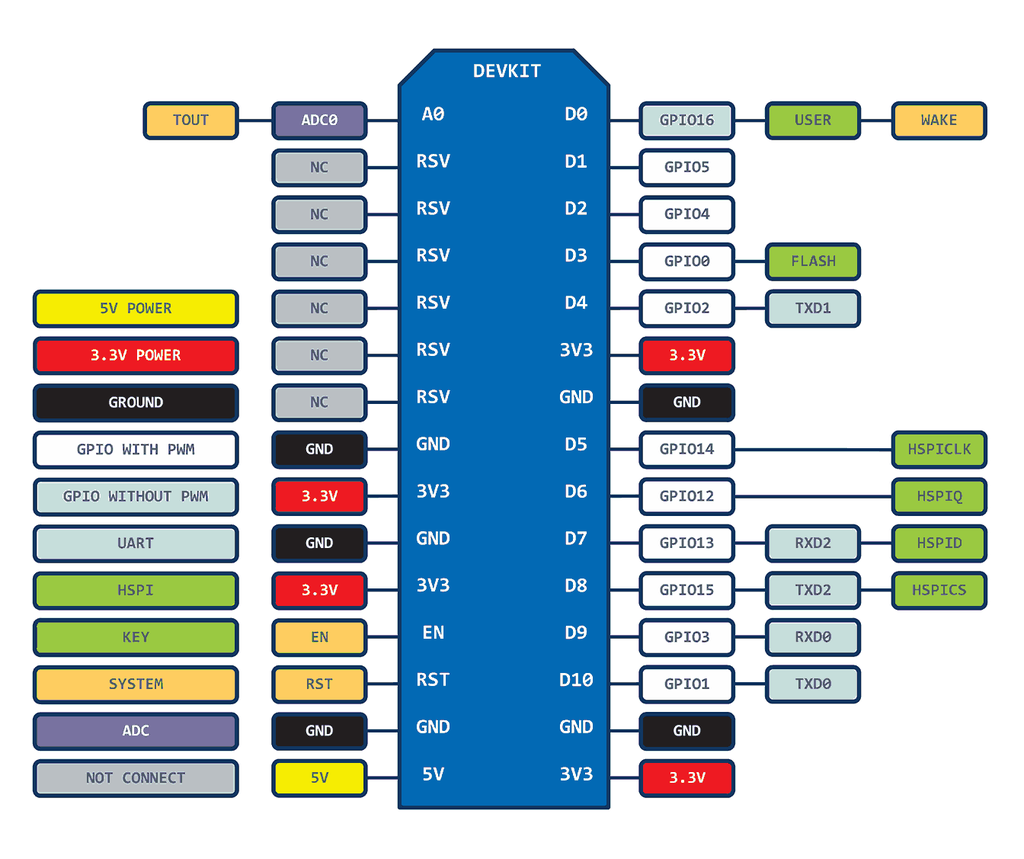
ESP8266 Pin Diagram
Getting Started with NodeMCU and Arduino
Once after successful installation of Arduino IDE (Follow references link to install Arduino IDE, Drivers, etc.), configure the IDE as below,
Step 1: Arduino IDE -> File – > Preferences – paste the below URL,
“http://arduino.esp8266.com/stable/package_esp8266com_index.json”


Step 2 : Tools -> Board -> Board Manager
Search ESP8266 device and install with right version. This will add ESP8266 board to arduino IDE.
Step 3: Now to recognize the nodemcu board on computer install the CP210x driver. Link can be found in below references tab.

Step 4: Select the ESP8266 board.
Tools -> Board -> esp8266 -> NodeMCU 1.0(ESP-12E Module)

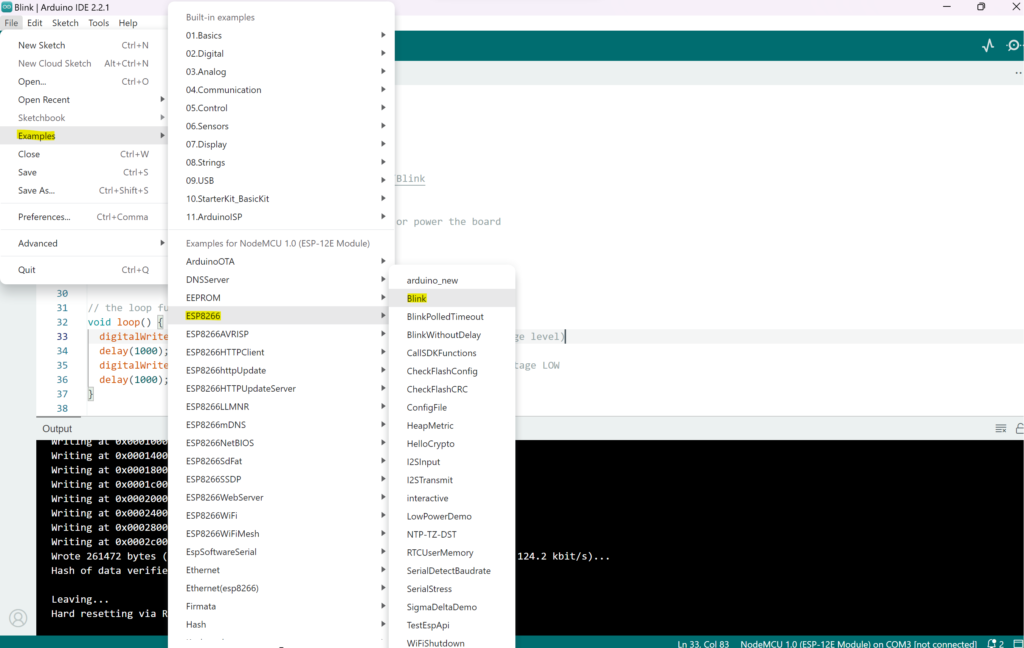
Step 5: Test the nodemcu by blinking the led.
File – > Example -> ESP8266 -> Blink
Step 6: Now compile the code and flash to NodeMCU.
Video Tutorial
References
- Arduino IDE download link – Software | Arduino
- Wiki link for NodeMCU – NodeMCU – Wikipedia
- ESP8266 NodeMCU datasheet – 0A-ESP8266__Datasheet__EN_v4.3.pages (components101.com)
- Purchase link for NodeMCU – Buy ESP8266 NodeMCU CP2102 Board at Lowest Price In India | Robu.in
- CP210x driver – CP210x USB to UART Bridge VCP Drivers – Silicon Labs (silabs.com)
6 responses to “Getting Started with ESP8266 NodeMCU using Arduino”
-
numquam molestias pariatur consequatur similique libero voluptatum sunt praesentium sed quis tempore et dolores consequatur est. itaque voluptate amet non rerum quae provident qui omnis aut nisi molestiae qui animi.
-
iste rem et illo et ratione saepe sed veritatis ipsa rem aut aut. natus doloribus quis nam doloremque eos dicta qui ad maxime alias sed eos qui facere eos vitae dolore.
-
sed vitae veritatis aliquid voluptate ea perferendis eum quaerat dignissimos dolore temporibus. aut voluptatum laudantium sit eaque earum at delectus deserunt necessitatibus ea exercitationem et numquam vitae et dolore sed. doloremque distinctio ab culpa dolores.
-
facilis ducimus doloremque similique vitae voluptatem ut nesciunt est. nostrum aliquam qui qui accusantium nisi molestiae dolores ut possimus id consequatur iste reiciendis dolore modi consectetur alias minus.
-
molestias aut animi labore qui qui eveniet itaque perferendis corporis quo adipisci natus enim et asperiores vero. maiores et cupiditate dignissimos tenetur atque voluptatem accusamus doloremque voluptatum. dicta dolorem iusto ad placeat voluptatem eaque blanditiis consequatur reprehenderit quasi est nihil optio. ullam et id est velit perferendis et ad praesentium perferendis sapiente sed sit cum perspiciatis amet inventore. assumenda labore est fugit inventore aperiam ut ipsam.
-
dolores accusamus totam id ut voluptatum ad rerum inventore illum. nihil ad esse ut incidunt aut ut inventore eaque eveniet aperiam dolores nihil et consequuntur voluptas quo alias eos et magni sunt quas.
Leave a Reply